This past Saturday the farm True Fields hosted their first Farm Day. I rode home with another mom and a total of five children. Judging by the noise level on the way home, Farm Day was a big hit with the kiddos! I believe Savannah said she wanted to go to Mrs. Jerica's farm everyday, even on Christmas and Valentines day.
Jerica and Matt Cadman opened up their farm to the community with the goal of educating others on the importance of sustainable farming and the nutrtional benefit of eating meat and dairy products raised in this environment. The educational aspect was hidden amoung the fun child-centered activities including milking a cow, making butter from fresh raw cream, collecting eggs from the hen house, feeding the pigs, and going for a hayride. And then there was the farm fresh scrumptious food. My daughter alone ate at least five of Jerica's fresh sausage balls and about 5 pieces of her homemade motzerella cheese. Refreshing homemade ice cream made with honey provided the finale for the evening.
The kids had a blast and learned where their food actually comes from (or where it should come from) and the parents gained insight that will hopefully affect future food choices. Sign up for their newsletters on their website, truefields.com so you will knowwhen the next Farm Day rolls around. It's something you don't want to miss. Heck it's worth going just to meet the Cadman's. This young couple's passion for health and sustainable farming (not sure if that's the correct term) are evident the first time they open thier mouths. These are the types of people you trust to get your food from. These are the type of people you want to get your grocery dollars. I have read that every dollar you spend on food you are indirectly farming. I farm at True Fields.
And on a side note, their piggies taste wonderful! We ordered a whole pig from them this past summer (it's less expensive if you buy the whole thing) and the meat has been tender and delicious. We have been so happy with thier products that we have already purchased 2 turkeys for Thanksgiving and Christmas.

Sunday, September 26, 2010
Monday, September 20, 2010
Pork Steak with Green Onions
From our kitchen:
Pork Steaks with Green Onions
3-4 Pork Steaks (our came from truefields.com)
1/4 cup farm fresh or homemade butter
1/4 cup organic soy sauce
1 bunch green onions (organic of course!)
2 garlic cloves
Melt butter in skillet and brown onions and garlic slightly. Add soy sauce and steaks. Cover and cook 8-10 minutes on each side and then another 10 minutes with the lid off.
I served this with pineapple chutney and a red cabbage recipe from Nourishing Traditions. Each item complemented the others well. A friend of mine mentioned on her blog that she has trouble coming up with side dishes that are not carbs. This red cabbage recipe is one of my favorites and I do not normally like cabbage. And a s a bonus, it's and an easy and cheap recipe! Seriously, buy the cookbook. I promise I do not have a financial relationship with them. It's just that good.
Site for sore eyes and a hungry palate
A friend of mine recommend this website to me a couple of months ago and I perused it a bit and thought it worth sharing. The writer of this blog/website is a stay at home mom with four boys who also gardens and makes everything from scratch. As I dug in further to her site I could tell that she believes similarly as me that if God didn't make it, we shouldn't eat it. When I noticed somewhere on her FAQ page that she is a fellow WAP (Weston A Price) momma, I knew I had to plug her page.
Check out heavenlyhomeaker.com for recipes, gardening tips, and more. For those of you trying to figure out the "soaking the grains" thing and have still not bought the cookbook Nourishing Traditions, her site offers recipes. Just this morning I made her breakfast cake recipe. And the name breakfast "cake" is no misnomer. This dish should be accompanied by a birthday candle and singing! In my opinion it is way too sweet to be an appropriate breakfast choice but if you cut the honey down to 1/4 cup (even 1/2 a cup would be an improvement over 3/4 cup), add dried nuts for protein, and serve with a cup of raw milk, buttermilk, or kefir then you have a decent breakfast that can be eaten on the go. You could even send a couple of pieces of high quality nitrate free bacon or sausage to go with it.
If you make any of her recipes that you like let me know. I love to share the good, bad, and disgusting so we can learn from each other.
Tuesday, September 14, 2010
Bring on the rain
Our weekly delivery of milk from our dairy co-op came the other day. Mark poured a glass for me after dinner the other night.
The extra rich and creamy milk hit my mouth with a bit of a surprise. "Did you shake it I asked?" Since we buy raw milk straight for the dairy you must always shake it before you pour because the cream rises to the top.
"Yes," he replied.
I took another sip and was sure of the indulgence this cup held. Again I inquired, "Are you sure you poured a glass of milk? You know I have cream in there as well."
"It's milk. I'm sure." And then he sips, "Wow. That's good stuff."
Apparently, the recent rains have had an effect on the cows diet. Both our cow milk and goat milk have been especially rich this past week. And the twang of late summer goat milk is gone replaced by a richer texture and improved flavor. If you have not tried raw milk before, now is a great time.
All this fat and cholesterol will go straight to Archer's head! With me drinking this nutrient rich milk, my milk is now fortified even more with brain food for Arch!
Find a dairy near you that provides raw fresh milk from grass-fed cows at realmilk.org.
Tuesday, September 7, 2010
Pineapple Chutney
If you followed the recipe in my previous post, you now have the by-product whey sitting in your refrigerator awaiting further instructions. What in the world could we possibly do with this odd smelling liquid? The same thing people did for thousands of years before we had refrigeration, lacto-fermentation of your fresh foods for preservation.
The preservation of fresh fruits and vegetables with lacto-fermentation increases the food's digestibility, increases the vitamin content, and provides probiotics which aid in the digestion of the other foods you eat. Once upon a time most of the foods consumed were fermented (I'm not talking booze here ;) including dairy, grains, fresh fruits and vegetables. With the creation of refrigeration this ancient practice was dropped and likewise our bowel health has dropped.
So go ahead and set your food out on the counter for a while and grow a few cultures of your own. This pineapple chutney recipe is a great place to start. This recipe along with many other lacto-fermentation recipes can be found in the essential cookbook, Nourishing Traditions by Sally Fallon. If lacto-fermentation really peaks your interest check out the book Wild Fermentation. It's one I hope to add to my collection when I can fit it into our budget (it's not expensive, I'm just cheap!).
Pineapple Chutney
1 small pineapple
1 bunch cilantro, coarsely chopped
1 tablespoon fresh ginger, grated
2 tablespoons fresh lime juice
1 teaspoon sea salt
1/4 cup whey
1/2 cup filtered water
Chop pineapple...


cilantro...

and ginger.

Toss in bowl with lime juice.

I also added one chopped red onion and a few peppers from the garden for a spicier version.

Mix well in a bowl.


Fill 1, 1 quart clean jar with mixture. Gently press to release natural juices and to be able to fit it all into the container. Leave a space of 1 inch from the top of jar.

Mix together whey, sea salt, and filtered water. Pour into jar until contents are covered.

Cover tightly and leave at room temperature for 2 days. The move chutney to the refrigerator to be stored. Eat within 2 months.

Add this yummy condiment to fish tacos, chicken salad, on top of pork, grilled, fish, chicken, in meat filled pita pockets, and on sandwiches and salads. The possibilities are endless!
Let me know how you liked it and how you are using it. If you have the book Nourishing Traditions try another favorite lacto-fermentation recipe of mine, Gingered Carrots. It's awesome on spicy meat, hamburgers, and sandwiches.
The preservation of fresh fruits and vegetables with lacto-fermentation increases the food's digestibility, increases the vitamin content, and provides probiotics which aid in the digestion of the other foods you eat. Once upon a time most of the foods consumed were fermented (I'm not talking booze here ;) including dairy, grains, fresh fruits and vegetables. With the creation of refrigeration this ancient practice was dropped and likewise our bowel health has dropped.
So go ahead and set your food out on the counter for a while and grow a few cultures of your own. This pineapple chutney recipe is a great place to start. This recipe along with many other lacto-fermentation recipes can be found in the essential cookbook, Nourishing Traditions by Sally Fallon. If lacto-fermentation really peaks your interest check out the book Wild Fermentation. It's one I hope to add to my collection when I can fit it into our budget (it's not expensive, I'm just cheap!).
Pineapple Chutney
1 small pineapple
1 bunch cilantro, coarsely chopped
1 tablespoon fresh ginger, grated
2 tablespoons fresh lime juice
1 teaspoon sea salt
1/4 cup whey
1/2 cup filtered water
Chop pineapple...


cilantro...

and ginger.

Toss in bowl with lime juice.

I also added one chopped red onion and a few peppers from the garden for a spicier version.

Mix well in a bowl.


Fill 1, 1 quart clean jar with mixture. Gently press to release natural juices and to be able to fit it all into the container. Leave a space of 1 inch from the top of jar.
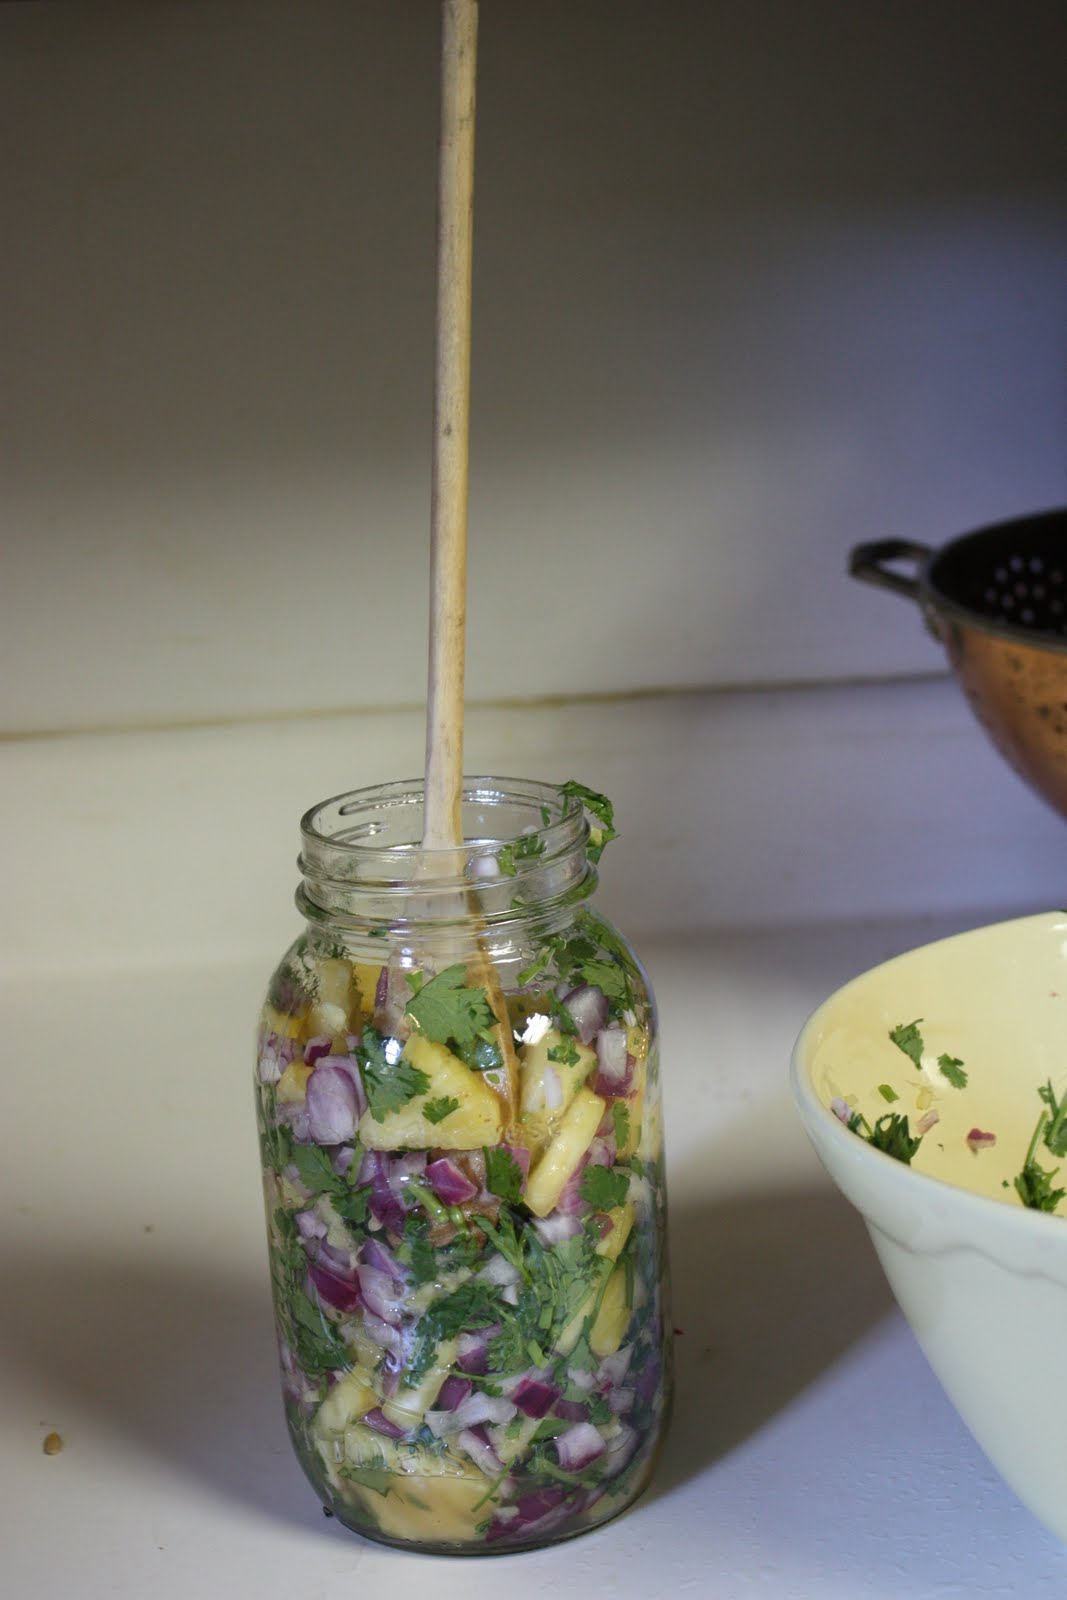
Mix together whey, sea salt, and filtered water. Pour into jar until contents are covered.

Cover tightly and leave at room temperature for 2 days. The move chutney to the refrigerator to be stored. Eat within 2 months.

Add this yummy condiment to fish tacos, chicken salad, on top of pork, grilled, fish, chicken, in meat filled pita pockets, and on sandwiches and salads. The possibilities are endless!
Let me know how you liked it and how you are using it. If you have the book Nourishing Traditions try another favorite lacto-fermentation recipe of mine, Gingered Carrots. It's awesome on spicy meat, hamburgers, and sandwiches.
Monday, August 30, 2010
What's up with Little Miss Muffet's cusine of choice?
Little Miss Muffet sat on her tuffet eating her curds and whey. There came a big sp...wait. Back up. Curds and whey? What in the world is that all about?
Definitions:
Curds- the thick casein-rich coagulated part of milk
Whey- the watery part of milk that has separated from the coagulated part of milk.
It all sounds pretty nasty right? Here is what I see when I read the definition.
Curd- mouth-watering creamy cheeses offering a variety of fat soluble vitamins, life sustaining protein, and an invaluable ingredient to pleasurable and nourishing cooking.
Whey- rich in vitamins and minerals, this substance has been used for thousands of years as a catalyst in lactofermentation. Lactofermentation was the original probiotic.
Sounds a bit more interesting now.
Even if you are just beginning to embark on the journey of good health this is a good place to start. Those of you who are a little farther down the path will find this is a great place to take the next plunge. Listed below are the steps for making your own curds and whey. By the end you will have delicious homemade cream cheese and whey. The cream cheese can be used on sandwiches, in recipes, for sauces, dips, or any other way you would use store bought cream cheese. They whey can be saved to inoculate recipes for lactofermentation. I will be posting more about the wonderful beneficial world of lactofermentation with instructions and pictures later this week. But for now you can take the first step and then kick back and enjoy the creamiest of cheeses.
Step 1
If you do not have homemade yogurt then I recommend buying this brand. It seems to provide the most whey and satisfactory cream cheese. If you buy just any old store brand of yogurt you will have trouble. Only buy high quality. And remember to always buy whole milk.

Step 2
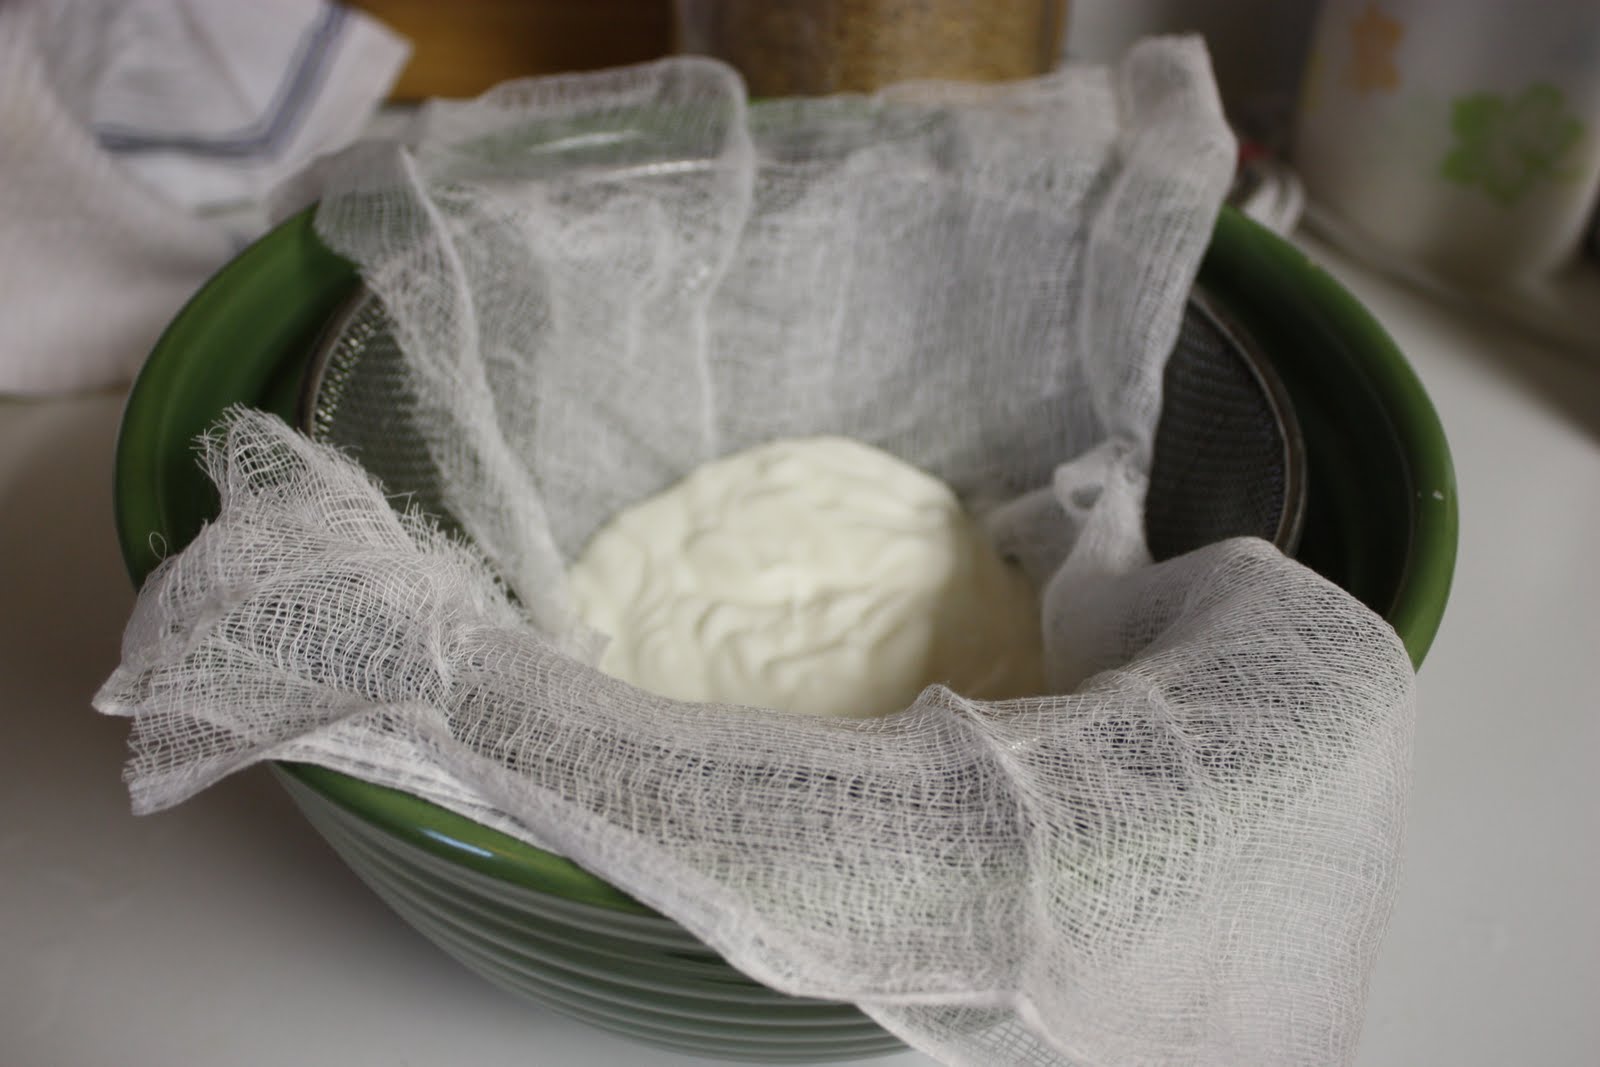
Put a metal strainer in a large bowl (not plastic).

Step 3
Cover the strainer with cheese cloth or a thin, clean dish towel and pour yogurt in.

Step 4
Cover with another clean dish towel and let sit on the counter at room temperature for several hours. The whey will start to drip through and collect in the bowl. Once the whey reaches the height of the strainer you will need to lift the curd higher. Tie the dish towel or cheese cloth up with twine and then tie it to a rod or wooden spoon. This will allow more whey to drip out. This process usually takes 24 hours from start to finish.

Step 5
When it stops dripping you can collect your cream cheese. It will keep in your fridge for about 1 month.

Step 6
Pour your whey in a clean glass jar and label with the date. Store this in your refrigerator up to 3 months.

Next up...what to do with this nutrition goldmine masquerading as an odd watery discharge!
Definitions:
Curds- the thick casein-rich coagulated part of milk
Whey- the watery part of milk that has separated from the coagulated part of milk.
It all sounds pretty nasty right? Here is what I see when I read the definition.
Curd- mouth-watering creamy cheeses offering a variety of fat soluble vitamins, life sustaining protein, and an invaluable ingredient to pleasurable and nourishing cooking.
Whey- rich in vitamins and minerals, this substance has been used for thousands of years as a catalyst in lactofermentation. Lactofermentation was the original probiotic.
Sounds a bit more interesting now.
Even if you are just beginning to embark on the journey of good health this is a good place to start. Those of you who are a little farther down the path will find this is a great place to take the next plunge. Listed below are the steps for making your own curds and whey. By the end you will have delicious homemade cream cheese and whey. The cream cheese can be used on sandwiches, in recipes, for sauces, dips, or any other way you would use store bought cream cheese. They whey can be saved to inoculate recipes for lactofermentation. I will be posting more about the wonderful beneficial world of lactofermentation with instructions and pictures later this week. But for now you can take the first step and then kick back and enjoy the creamiest of cheeses.
Step 1
If you do not have homemade yogurt then I recommend buying this brand. It seems to provide the most whey and satisfactory cream cheese. If you buy just any old store brand of yogurt you will have trouble. Only buy high quality. And remember to always buy whole milk.

Step 2
Put a metal strainer in a large bowl (not plastic).

Step 3
Cover the strainer with cheese cloth or a thin, clean dish towel and pour yogurt in.
Step 4
Cover with another clean dish towel and let sit on the counter at room temperature for several hours. The whey will start to drip through and collect in the bowl. Once the whey reaches the height of the strainer you will need to lift the curd higher. Tie the dish towel or cheese cloth up with twine and then tie it to a rod or wooden spoon. This will allow more whey to drip out. This process usually takes 24 hours from start to finish.

Step 5
When it stops dripping you can collect your cream cheese. It will keep in your fridge for about 1 month.

Step 6
Pour your whey in a clean glass jar and label with the date. Store this in your refrigerator up to 3 months.

Next up...what to do with this nutrition goldmine masquerading as an odd watery discharge!
Tuesday, August 3, 2010
Hold Please...
Pardon the pause in my posts. The nutrition class I am currently teaching seems to be monoplolizing my normally allocated blogging time.
I promise posts will resume shortly.
I promise posts will resume shortly.
Subscribe to:
Posts (Atom)